Entering the Safe Mode in previous versions of Windows excluding Windows 8 was a lot easier as compared to the later builds i.e. Windows 8 and Windows 10. By pressing the F8 button at the start-up on previous versions of Windows, users could enter the Safe Mode without any problem but with fast booting feature inside Windows 8 and Windows 10, it is practically impossible to interrupt the booting process and F8 is no more helpful. So, this guide will assist you through towards entering the safe mode inside Windows 10.
Method # 1: Using “Shift (Button) + Restart (Option)” Combination
This method is a lot easier as compared to others. Using a combination can let you enter into the Safe Mode. Follow the steps below to enter the Safe Mode using a combination.
Go to Start Menu and click on the Power button located on the bottom left pane.
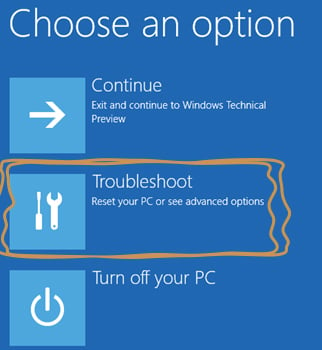
While pressing the Shift key on the keyboard, click on the Restart option using the left mouse button. It would interrupt the normal start of PC by displaying a list of options to select from. Select Troubleshoot from the options and it would take you to the next screen.
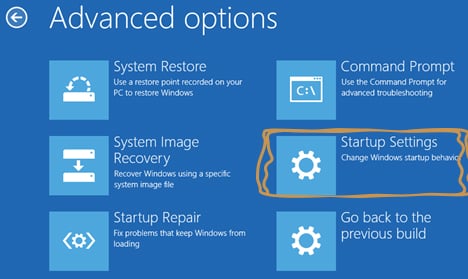
On the next screen, click on Advanced Options highlighted in the image below.
Inside the Advanced options screen, select the Startup Settings and restart your PC using the button below.
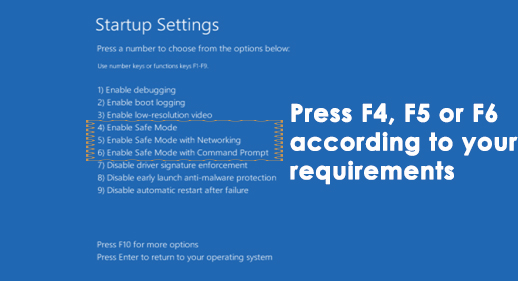
After the PC is rebooted, you will find a number of options to select from a list using F1 – F9 function keys. If you want to boot the computer into Safe Mode, press the F4, F5 or F6 function keys depending on your requirements. Now, your PC will boot in Safe Mode.
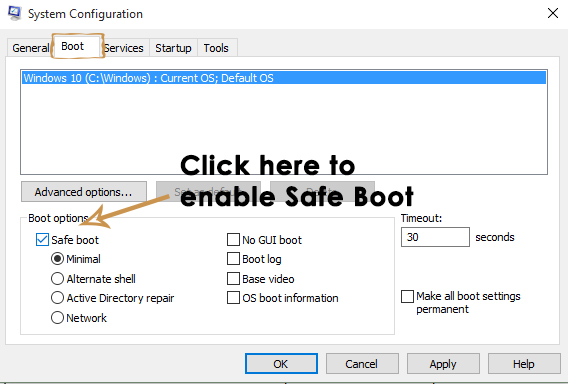
Method # 2: Using System Configuration Tool
This is the easiest of all methods. The system configuration tool is provided inside Windows 10 to help the users to change the configuration of Windows according to their requirements. In order to boot your Windows in Safe Mode using SCT, follow the steps below.
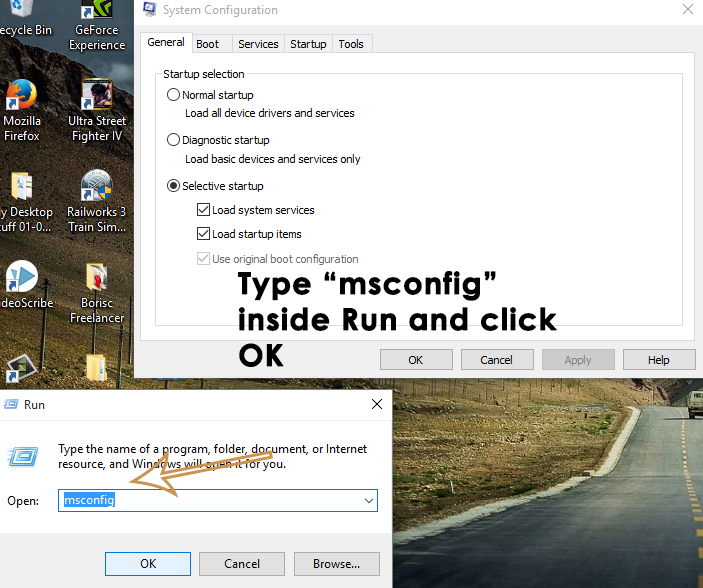
Open the Run window by pressing Win + R on the keyboard and type msconfig inside the text field. Press the Enter key to execute the program. You can also open it by searching System Configuration Tool inside cortana.
Navigate to the Boot tab and check the box labeled as Safe boot inside Boot options. Click on Apply and OK button afterwards. Click on the Restart button if you want to restart your PC at the same exact time. You can also restart your PC manually by clicking on Exit without restart
Method # 3: Using a Recovery Drive to Boot Windows
A recovery drive is a resource that helps the users to boot their PCs if something bad happens to the Windows. Windows 10 has introduced a unique app called Recovery Drive app that lets the users create a recovery inside a USB. This recovery USB is then used to boot the Windows into Safe Mode. To create a USB recovery drive, follow the instructions below.
Search for Recovery Drive using Cortana and run it as an administrator. Connect the USB dongle and click Next button in order to create a recovery drive.
Boot your computer with this recovery drive and follow the instructions of Method #1 in order to boot the system in Safe Mode.
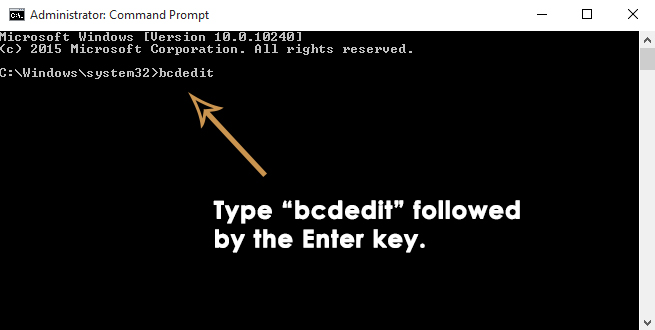
Method # 4: Starting Safe Mode at Startup Using Command Prompt
If you can’t start the safe mode using above methods as your PC doesn’t let you boot Windows, then you might need to start it up in safe mode using Command Prompt. Follow the steps below to enter into safe mode at startup using command prompt.
Open an elevated command prompt by using a Windows 10 Installation Media. Boot the PC using Windows 10 bootable USB and inside the Setup, choose Repair your computer.
On the next screen, follow the instructions mentioned in Method # 1 to open the Advanced Options. Click on Command Prompt and enter your password credentials in order to boot PC using a command prompt.
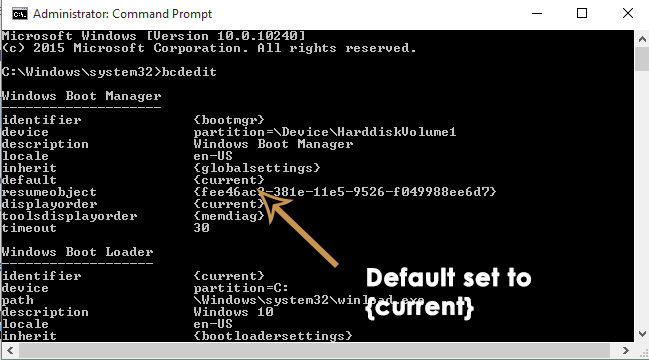
When inside the Command prompt, type bcdedit followed by the Enter key
After hitting Enter key, it would display a minimal list of options organized into sections. At the top, you will see Windows Boot Manager Check for the Default option and note of its identifier that will be located to the right. In my case, it is set to {current}.
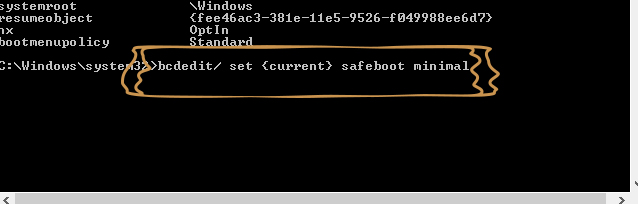
To boot Windows 10 in safe mode, type the following line inside the command prompt and hit Enter bcdedit /set {current} safeboot minimal Note: In the above command, {current} is an identifier which you noted before. If you want to start Windows 10 in Safe Mode with Networking, just replace the safeboot minimal with safeboot network in the above command.
Method # 5: Enable legacy Advanced Boot Options to Use “F8” Key
You can set the old F8 key method that was used to interrupt the normal startup of Windows. So, follow the instructions to enable legacy Advanced Boot Options.
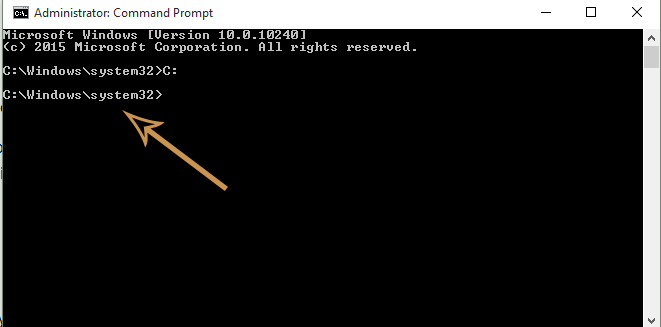
Open the command prompt by following instructions inside Method # 4 Type C: inside the command prompt and hit Enter key.
Inside the command prompt, copy and paste the following command to execute. Press Enter bcdedit /set {default} bootmenupolicy legacy
Now, make sure your Hard Drive is set at first position inside Boot order (BIOS) to load the Windows from Hard Drive.
Restart your PC and press F8 key repeatedly until it boots you inside Advanced Options. Select the Safe Mode using the arrow keys on your keyboard and that’s all you need to do.
How to Start PlayStation 4 in Safe Mode?How to Get Out of Safe Mode on a Windows ComputerHow to Boot Windows 11 in Safe ModeFix: Windows 10 is stuck in safe mode